使用情境:
router下面放了兩台PC, 原本都是用VPN先連到router, 然後再遠端到裡面的機器
後來把其中一台PC設為DMZ之後, 就一直無法連到router的VPN
在猜有可能是設為DMZ之後, 原本VPN使用的PPTP port也變成該PC, 而不是連到router
參考這邊的說明
https://www.asus.com/hk/support/FAQ/1033906/
去router的設定頁面新增兩筆port forwarding的資訊

然後就可以繼續用VPN了!!
使用情境:
router下面放了兩台PC, 原本都是用VPN先連到router, 然後再遠端到裡面的機器
後來把其中一台PC設為DMZ之後, 就一直無法連到router的VPN
在猜有可能是設為DMZ之後, 原本VPN使用的PPTP port也變成該PC, 而不是連到router
參考這邊的說明
https://www.asus.com/hk/support/FAQ/1033906/
去router的設定頁面新增兩筆port forwarding的資訊
前陣子拿到這台筆電, 想裝個ubuntu來跑程式
加上發現內建的win11是家用版(!?) 想改裝學校授權的版本
後來看到這篇文章: 升級硬碟到2TB
https://www.mobile01.com/topicdetail.php?f=233&t=6691576
然後就買一個2TB硬碟回來重裝系統 XD
----
0. 先拆硬碟, 然後放夾鏈袋當備份
1. 硬碟裝上去之後, 安裝win11
原本BIOS會預設使用Intel RST功能, 如果啟用此功能, 安裝win 11需要另外載入驅動
可是後續的ubuntu會發生問題
最簡單的做法就是進去BIOS改為AHCI mode, 然後再安裝win 11
VMD controller改為disable
裝win11的時候, 預設要使用M$帳號, 如果想用離線帳戶的話, 可以參考此做法:
https://unikoshardware.com/2022/05/windows-11-22h2-add-offline-user.html
文字版說明: 看到win11的安裝畫面後, 按 shift + F10, 會跳出終端機的畫面
然後輸入: oobe\bypassnro
安裝畫面會重新啟動, 不過後面會多一個設定離線帳戶的選項
這個階段不能連接網路! (不能連wifi, 也不要先接USB網卡)
如果有先連網路的話, 輸入oobe\bypassnro也不能設定離線帳戶
2. 使用AHCI mode安裝完win 11後, 就可以順利安裝ubuntu
這邊的討論串有很多資料
https://stats.stackexchange.com/questions/118033/best-series-of-colors-to-use-for-differentiating-series-in-publication-quality
從討論串可以挑選一些顏色參考建議
以下是一些例子
http://vis.stanford.edu/files/2013-SemanticColor-EuroVis.pdf

https://personal.sron.nl/~pault/

https://medialab.github.io/iwanthue/ (可以輸入分群的數量)

最近學到的新樣式: three line table
Small Guide to Making Nice Tables
https://people.inf.ethz.ch/markusp/teaching/guides/guide-tables.pdf



今天傳camera ready論文到IEEE上, 然後一直遇到fail, 錯誤訊息說:
Errors: Font Arial, Arial,Bold is not embedded (165x on page 2)
論文是用overleaf寫的, 後來查到這篇:
https://www.overleaf.com/learn/latex/Questions/My_submission_was_rejected_by_the_journal_because_%22Font_XYZ_is_not_embedded%22._What_can_I_do%3F
摘錄重點如下:
Alternatively, you can get Overleaf to post-process the PDF for you, though this may cause your project to take some longer time to compile. First, add a file called latexmkrc (without extensions) to your project, and then paste the following line in that file:
$pdflatex = 'pdflatex %O %S; ps2pdf14 -dPDFSETTINGS=/prepress %B.pdf %B-embed.pdf; mv %B-embed.pdf %B.pdf';
You may have to make some kind of small change in your .tex file to trigger a re-compilation and the post-processing to happen.
簡單說就是, 在自己的overleaf專案首頁開一個新的檔案: latexmkrc, 不需要副檔名
裡面貼上這段指令
$pdflatex = 'pdflatex %O %S; ps2pdf14 -dPDFSETTINGS=/prepress %B.pdf %B-embed.pdf; mv %B-embed.pdf %B.pdf';
重新編譯 & 再度上傳就pass了!!
雖然官網的安裝方式有提到 (https://podman.io/docs/installation)
sudo mkdir -p /etc/apt/keyrings
curl -fsSL https://download.opensuse.org/repositories/devel:kubic:libcontainers:unstable/xUbuntu_$(lsb_release -rs)/Release.key \
| gpg --dearmor \
| sudo tee /etc/apt/keyrings/devel_kubic_libcontainers_unstable.gpg > /dev/null
echo \
"deb [arch=$(dpkg --print-architecture) signed-by=/etc/apt/keyrings/devel_kubic_libcontainers_unstable.gpg]\
https://download.opensuse.org/repositories/devel:kubic:libcontainers:unstable/xUbuntu_$(lsb_release -rs)/ /" \
| sudo tee /etc/apt/sources.list.d/devel:kubic:libcontainers:unstable.list > /dev/null
sudo apt-get update -qq
sudo apt-get -qq -y install podman
只是對20.04來說, 這個URL是無效的 QQ
後來參考這篇 (https://phoenixnap.com/kb/install-podman-on-ubuntu) & 自行去撈路徑
修改如下:
sudo mkdir -p /etc/apt/keyrings
curl -fsSL https://download.opensuse.org/repositories/devel:/kubic:/libcontainers:/stable/xUbuntu_20.04/Release.key \
| gpg --dearmor \
| sudo tee /etc/apt/keyrings/devel_kubic_libcontainers_unstable.gpg > /dev/null
echo \
"deb [arch=$(dpkg --print-architecture) signed-by=/etc/apt/keyrings/devel_kubic_libcontainers_unstable.gpg]\
https://download.opensuse.org/repositories/devel:/kubic:/libcontainers:/stable/xUbuntu_20.04/ /" \
| sudo tee /etc/apt/sources.list.d/devel:kubic:libcontainers:unstable.list > /dev/null
sudo apt update
sudo apt install podman
情境: 手邊有兩台NAS, 可是router的網路孔不夠多. NAS上其實有兩個網路孔可以用, 所以就變成這種接法:
router ---------- NAS1 ---------- NAS2
這種接法的好處就是只會占用一個router的port, 可是要在NAS1裡面設定bridge的功能
相關教學如下:
1. https://rolisz.ro/2020/05/19/bridging-networks-with-a-synology-nas/
2. (推薦這個) https://github.com/maao666/Synology-Bridging
利用2的方法, 把它的腳本抓下來 (vswitch_bridge.sh), 接著再去NAS後台設定的任務排程
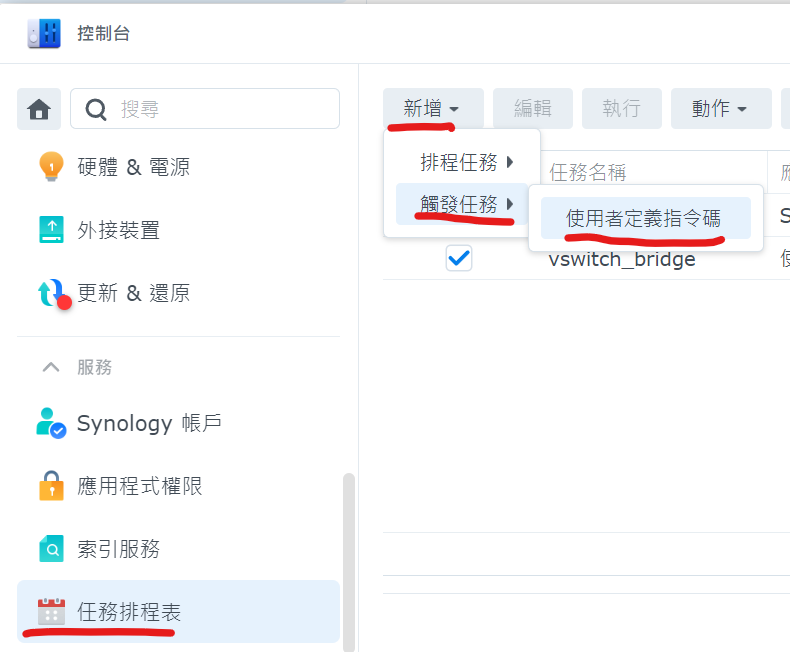
建立一個新的使用者任務, 指令輸入 bash xxxxxxxx.sh start

在找VPN的設定時, 發現這個第三方韌體 XD
使用上非常簡單, 就是去網站找是否有相同型號的router, 然後抓相應的檔案下來
之後再用asus router內建的後台網站, 直接上傳檔案就好!!
刷完後, router設定都還在, 介面也幾乎一樣, 只是多了很多參數可以設定
https://www.asuswrt-merlin.net/
最近在轉移信箱, 結果就得信全部標示為 未讀
網路上查到的都是已知的方法, 像是去設定每頁100封郵件, 然後標示為已讀
OS: 那我要按100多次耶....
後來試出一個簡易的方法 XD
在搜尋列輸入 label:unread (尋找未讀郵件), 然後按建立篩選器 (如下圖)


然後把"標示為已讀"打勾
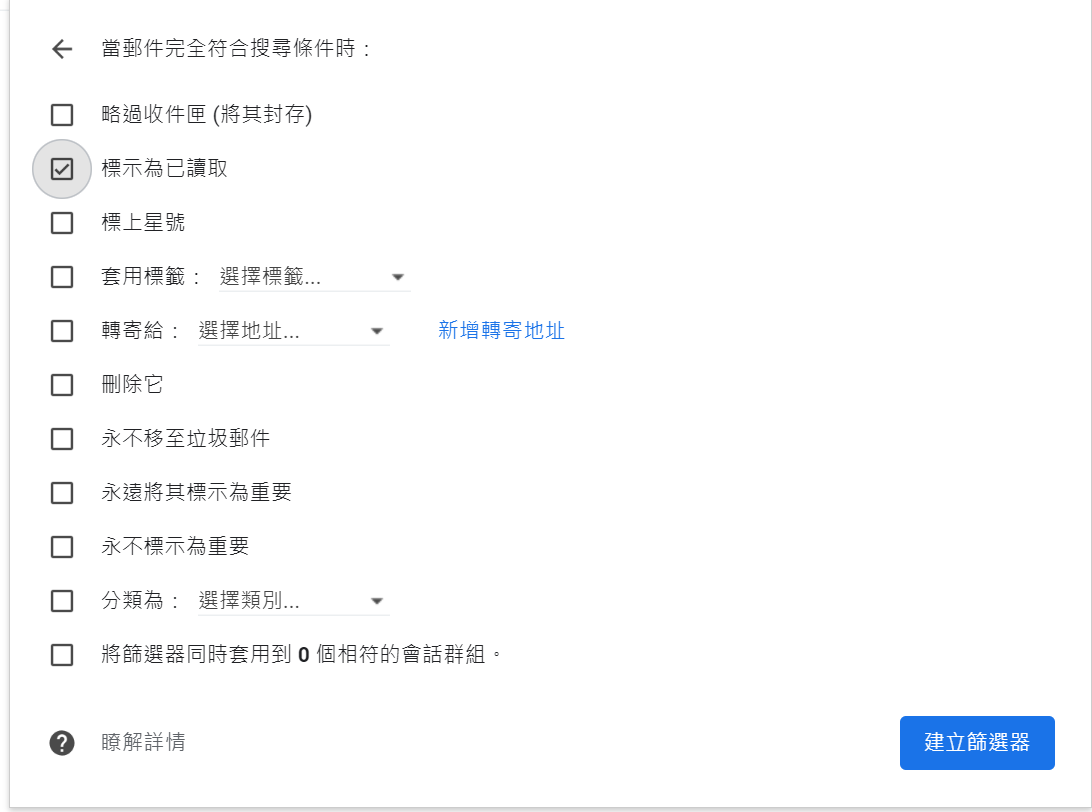
使用完記得去設定, 把這個篩選器刪掉

