wufish XD
架站心得(吧!?)
2024年6月3日 星期一
[蠢問題] synology mail station 無法登入
2024年5月30日 星期四
2024年5月9日 星期四
RTMP串流到synology NAS的監控中心
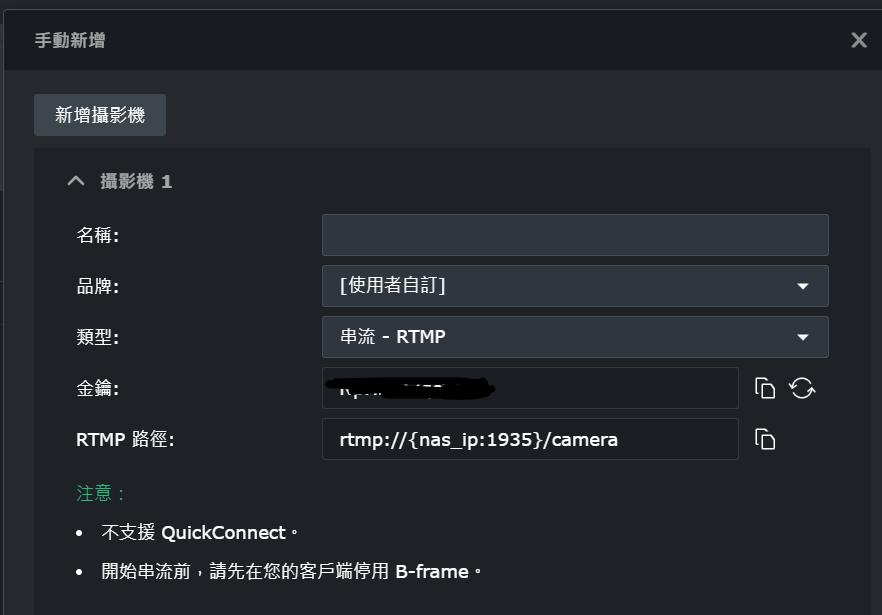
手邊的NAS可以安裝surveillance station套件, 進去之後可以新增攝影機
如果想用開發版的攝影機, 可以使用RTMP的設定 (可參考下圖)
手邊的開發板是PI4 (不過我覺得jetson nano應該也通用)
使用下面的python code就可以把影像直接上傳到監控中心 (chatgpt提供)
code就貼在下面, 只是排版很亂, 懶得研究就先這樣了 XD
import subprocess
def start_rtmp_stream(input_device, output_url):
command = [
'ffmpeg',
'-f', 'v4l2',
'-input_format', 'h264',
'-video_size', '1280x720',
'-framerate', '30',
'-i', input_device,
'-c', 'copy',
'-f', 'flv',
output_url
]
subprocess.Popen(command)
if __name__ == "__main__":
input_device = '/dev/video0'
output_url = 'rtmp://your_rtmp_server/your_stream_key'
start_rtmp_stream(input_device, output_url)
2024年4月12日 星期五
在SSH執行rpicam-hello
原本是要用圖形介面執行 (VNC), 指令如下
rpicam-hello --tuning-file /usr/share/libcamera/ipa/rpi/vc4/imx219_noir.json
如果在SSH執行會有錯誤訊息, 如下:
terminate called after throwing an instance of 'std::runtime_error'
what(): failed to import fd 20
Aborted
不過根據討論串: https://forums.raspberrypi.com/viewtopic.php?t=338799
可以在後面加上--qt-preview, 就可以出現畫面了! (只是比較慢) 舉例來說:
rpicam-hello --tuning-file /usr/share/libcamera/ipa/rpi/vc4/imx219_noir.json --qt-preview
2024年3月27日 星期三
停用特定顯卡
遇到的問題: 執行nvidia-smi的時候, 會出現某個GPU故障 (如下圖)
因為機器在機房, 也不太可能跑過去拆顯卡 (光是從機櫃搬下來就超累了 QQ)
然後就查了一下, 看是否有辦法用指令的方式停用顯卡, 然後就找到下列討論串:
* https://forums.developer.nvidia.com/t/how-to-turn-off-specific-gpu/107574
* https://forums.developer.nvidia.com/t/nvidia-smi-drain-failed-to-parse-device-specified-at-the-command-line/180402/3
* https://man.archlinux.org/man/nvidia-smi.1.en
* https://juejin.cn/post/7232665460714012731
步驟如下:
1. 使用nvidia-smi查詢狀態, 找出有異常的Bus-Id. 以第一張圖為例, 是第二個顯卡有問題, 顯示ERR! 他的ID是00000000:03:00.0
2. 接著用 nvidia-smi drain -p 0000:03:00.0 -q 查詢drain mode狀態 (原本ID第一組數字有8個0, 只要打4個0就好)
> The current drain state of GPU 00000000:03:00.0 is: not draining.
3. 設定drain mode: sudo nvidia-smi drain -p 0000:03:00.0 -m 1
> Successfully set GPU 00000000:03:00.0 drain state to: draining.
4. 確認狀態: nvidia-smi drain -p 0000:03:00.0 -q
> The current drain state of GPU 00000000:03:00.0 is: draining.
5. GPU reset: sudo nvidia-smi drain -p 0000:03:00.0 -r
>GPU 00000000:03:00.0 successfully removed.
然後再用nvidia-smi就看不到那張出問題的GPU了
補充: 查詢錯誤原因
ref:
* https://docs.nvidia.com/deploy/xid-errors/index.html
* https://houmin.cc/posts/feaa4605/
搜尋系統log, 路徑是/var/log/syslog, 不過也有可能變成syslog.1, 偷懶的話可以直接搜尋整個log資料夾: grep "NVRM: Xid" /var/log/*
以我的情況為例, 有看到
NVRM: Xid (PCI:0000:03:00): 62,
NVRM: Xid (PCI:0000:03:00): 32,
NVRM: Xid (PCI:0000:03:00): 31,
接著再去xid-errors網站查詢對應的資訊
31: GPU memory page fault
32: Invalid or corrupted push buffer stream
62: Internal micro-controller halt (newer drivers)
雖然看到原因, 可是也不知道要怎麼處理 QQ (應該就是換GPU吧? XD
2024年3月22日 星期五
mpu9250檢查磁力計的i2c address
最近上課用新的IMU: MPU9250 (其實這個也不新了 QQ)
不過跑程式的時候, 有人會遇到Remote I/O Error
仔細檢查後, 發現是磁力計的部分有回報錯誤, 把磁力計的function關閉就可以讀取acc + gyro了
之前的GY801, 可以直接用sudo i2cdetect -y 查詢acc, gyro, mag, baro各自的I2C位址
可是MPU9250不行, 只能找到0x68的位置
後來閱讀datasheet的時候, 看到bypass mode的設定方式
> 啟用bypass可讓System Processor能直接管理、存取與控制連接在MPU-9250上的auxiliary sensor
回頭看一下python code跟sample code, 可以在終端機裡面設定這個模式:
以下都是在python環境下執行 (終端機輸入python後)
>>> import smbus
>>> bus = smbus.SMBus(1)
>>> bus.write_byte_data(0x68, 0x37, 0x02)
然後再開另一個終端機執行sudo i2cdetect -y 1
下圖是正常的mpu9250 (可提供9軸資訊)會發現這邊只有0x68, 沒有磁力計的0x0c
2023年11月24日 星期五
latex的titleformat
https://tex.stackexchange.com/questions/339305/how-to-get-default-formatting-for-chapter-section-etc
\titleformat{\chapter}[display]
{\normalfont\huge\bfseries}{\chaptertitlename\ \thechapter}{20pt}{\Huge}
\titleformat{\section}
{\normalfont\Large\bfseries}{\thesection}{1em}{}
\titleformat{\subsection}
{\normalfont\large\bfseries}{\thesubsection}{1em}{}
\titleformat{\subsubsection}
{\normalfont\normalsize\bfseries}{\thesubsubsection}{1em}{}
\titleformat{\paragraph}[runin]
{\normalfont\normalsize\bfseries}{\theparagraph}{1em}{}
\titleformat{\subparagraph}[runin]
{\normalfont\normalsize\bfseries}{\thesubparagraph}{1em}{}
\titlespacing*{\chapter} {0pt}{50pt}{40pt}
\titlespacing*{\section} {0pt}{3.5ex plus 1ex minus .2ex}{2.3ex plus .2ex}
\titlespacing*{\subsection} {0pt}{3.25ex plus 1ex minus .2ex}{1.5ex plus .2ex}
\titlespacing*{\subsubsection}{0pt}{3.25ex plus 1ex minus .2ex}{1.5ex plus .2ex}
\titlespacing*{\paragraph} {0pt}{3.25ex plus 1ex minus .2ex}{1em}
\titlespacing*{\subparagraph} {\parindent}{3.25ex plus 1ex minus .2ex}{1em}